Saturday, April 24, 2010

Dried-Fruit and Nut Health Bars

Dried-Fruit and Nut Health Bars
 
Dried-Fruit and Nut Health Bars

Oats bring a pleasant chewiness and an old-fashioned goodness to these nutrient-dense bars. Pureed dates lend just enough sweetness to this convenient breakfast or snack.

Ingredients

Makes 8

  • 1 cup (9 ounces) pitted dates
  • Vegetable-oil cooking spray
  • 1 1/2 cups old-fashioned oats, finely ground, or 1 cup quinoa flakes
  • 4 1/2 ounces (1 cup) pecans, toasted, 1/2 finely ground and 1/2 coarsely chopped
  • 2 ounces (1/2 cup) unsalted macadamia nuts, toasted, 1/2 finely ground and 1/2 coarsely chopped
  • 2 1/4 ounces (1/3 cup) dried papaya, cut into 1/2-inch pieces
  • 1 3/4 ounces (1/3 cup) dried cherries, chopped
  • 2 ounces (1/3 cup) dried blueberries
  • 2 tablespoons oat bran
  • 3 tablespoons ground flaxseed
  • 2 tablespoons wheat germ
  • 1/2 teaspoon coarse salt
  • 1/2 teaspoon ground cinnamon
  • 3 tablespoons brown-rice syrup or honey

Directions

  1. Preheat oven to 350 degrees. Place dates in a small saucepan, cover with cold water, and bring to a simmer. Drain. Puree in a food processor until smooth.
  2. Coat an 8-inch square baking pan with cooking spray. Mix oats or quinoa flakes, nuts, papaya, cherries, blueberries, bran, flaxseed, wheat germ, salt, and cinnamon in a large bowl. Mix in date puree and brown-rice syrup or honey. Press mixture into pan.
  3. Bake until center is firm and edges are golden, about 25 minutes. Let cool in pan on a wire rack. Cut into 8 bars.
From Martha Stewart Living, July 2008
 

 Veronica 

 http://averycountrychristmas.blogspot.com/

http://veronicas-korner.blogspot.com/


Friday, April 23, 2010

White Chocolate-Chunk Cookies

White Chocolate-Chunk Cookies
 
White Chocolate-Chunk Cookies

A glass of milk is the ideal accompaniment to these drop cookies. Besides white chocolate, the cookies are also chockablock with oats, coconut, golden raisins, and walnuts.

Ingredients

Makes about 4 dozen

  • 1 cup (2 sticks) unsalted butter, room temperature
  • 1/2 cup granulated sugar
  • 1/2 cup packed light-brown sugar
  • 2 large eggs
  • 1 teaspoon pure vanilla extract
  • 2 cups all-purpose flour
  • 1 teaspoon baking soda
  • 1/2 teaspoon baking powder
  • 1/2 teaspoon coarse salt
  • 2 cups old-fashioned rolled oats
  • 2 cups good-quality white chocolate chunks
  • 1 cup sweetened flaked coconut
  • 1 cup golden raisins
  • 1 cup coarsely chopped walnuts (about 4 ounces)

Directions

  1. Preheat oven to 350 degrees. Put butter and sugars in the bowl of an electric mixer fitted with the paddle attachment. Mix on medium speed until smooth and creamy, about 2 minutes. Mix in eggs one at a time until combined. Stir in vanilla.
  2. Sift flour, baking soda, baking powder, and salt into a medium bowl. Gradually stir into butter mixture until combined. Stir in oats, chocolate, coconut, raisins, and walnuts.
  3. Drop batter by heaping tablespoons onto baking sheets lined with parchment paper, spacing about 2 inches apart. Flatten slightly. Bake cookies until golden, 16 to 18 minutes. Let cool on sheets on wire racks for 2 minutes. Transfer cookies to racks to cool completely. Cookies can be stored in airtight containers at room temperature up to 3 days.

  4.  

 Veronica 

 http://averycountrychristmas.blogspot.com/

http://veronicas-korner.blogspot.com/


Cornmeal-Cherry Cookies


Cornmeal-Cherry Cookies
 
Cornmeal-Cherry Cookies

Cornmeal gives these not-too-sweet cookies a crumbly texture and golden color. Keep an extra log in the freezer-you can slice off and bake as many cookies as you want. The parchment-wrapped dough can be placed in a resealable plastic bag and frozen for 3 months. The dough can be sliced while partially frozen, then baked for the same amount of time. This recipe is easily doubled or tripled. Be sure to rotate the log a quarter turn after making each slice. This will help it maintain its shape.

Prep: 30 minutes
Total: 1 hour 45 minutes

Ingredients

Makes 32

  • 1 cup all-purpose flour, plus more for work surface
  • 1/2 cup yellow cornmeal
  • 1/2 teaspoon baking powder
  • 1/8 teaspoon salt
  • 6 tablespoons unsalted butter, room temperature
  • 1/4 cup sugar
  • 1/2 teaspoon vanilla extract
  • 1 large egg
  • 1 teaspoon freshly grated orange zest
  • 1/4 cup dried cherries or cranberries, finely chopped

Directions

  1. In a medium bowl, whisk together flour, cornmeal, baking powder, and salt. With an electric mixer, cream butter and sugar until light and fluffy. Beat in vanilla, egg, and orange zest. With mixer on low, gradually add flour mixture; beat until just combined. Stir in cherries.
  2. Transfer dough to a lightly floured surface; pat into a log, 8 inches long and 2 inches wide. Wrap dough in parchment; form it into a rectangle by flattening the top and sides with your hands. Twist ends of parchment to seal. Refrigerate until firm, at least 1 hour.
  3. Preheat oven to 350 degrees. Line two baking sheets with parchment. Slice dough 1/4 inch thick, rotating log 1/4 turn after each slice. Place 1/2 inch apart on baking sheets. Bake, rotating sheets halfway through, until cookies are firm to the touch, 10 to 12 minutes. Cool cookies on a wire rack. Store in airtight containers at room temperature up to 1 week.
From Everyday Food, December 2003


 Veronica 

 http://averycountrychristmas.blogspot.com/

http://veronicas-korner.blogspot.com/


Faux Stone Art Necklace

Faux Stone Art Necklace
Create a unique, elegant, handcrafted jewelry piece. The transparent, acid-free dye inks create a polished stone effect. Layer the inks to add depth to color combinations without adding bulk. You'll be amazed at what these little ink bottles can do!
Faux Stone Art Necklace

you'll need
Surface & Embellishments
• Inkssentials Memory Glass™*, two.
• Inkssentials Memory Frame™*.
• Tim Holtz® Adirondack® Alcohol Inks*: Silver; Slate.
• Star Dust Stickles™ Glitter Glue*.
• Coordinating beads of choice (Cousin Corporation of America).
Tools & Supplies
• Jewelry findings (Cousin Corporation of America).
• Clear thread.

what to do
1 Add several drops of silver and slate alcohol inks to one memory glass piece; let dry. Apply Star Dust glitter glue to remaining glass piece. Press glass pieces together so alcohol ink and glitter are together. Insert decorated glass into frame to create a pendant.
2 String beads of choice onto clear thread to create a necklace, placing pendant at bottom center.

Design by Jolene Johnston.

 Veronica 

 http://averycountrychristmas.blogspot.com/

http://veronicas-korner.blogspot.com/


Mother's Day Garden Gift Tote and Card

Mother's Day Garden Gift Tote and Card
Create the perfect gift basket for the mom who is an avid gardener. Complete with decorated spade and trowel, row markers, small planting pot, gloves, and seeds, then coupled with a matching card, this basket is one she'll truly appreciate.

Mother's Day Gift

you'll need
Surface and Papers
• Wood tote (Hobby Lobby), 12" W x 7" D x 5" T (not including handle).
• Papers (American Crafts&trade): Florentine; Hummus; French Onion.
• Card stock: brown, white, blue, coral.
Embellishments
• Buttons: red, ½" five; green, 5/8", four; blue, 5/8", three.
• Grosgrain ribbon: blue with brown edging, ½"-wide.
• Rub-ons (American Crafts™): Spring and Summer.
• Brown silk flower.
• Paper flowers, three each (American Crafts™): white, coral.
Tools & Supplies
• Baby Blue Americana® Acrylics (DecoArt®).
• Paintbrush.
• Zip Dry™ Paper Glue (Beacon Adhesives).
• Fancy edged scissors (Fiskars®): zigzag; wavy edged.
• Garden supplies (Lowes): trowel, spade, row markers, gloves.
• Excelsior.
• Computer and printer.
• Flower seed packets.
• General supplies: scissors, ruler.


what to do
Tote
1 Use photo as guide to cover front and back of tote with patterned papers.
2 Cut a 2"-wide strip to width of tote from brown card stock; trim one long edge with zigzag scissors and adhere to tote so straight edge is aligned with top edge of tote. Cut blue leaves from Hummus paper; adhere randomly to card stock strip. Randomly glue red buttons to leaves.
3 Transfer rub-ons to white card stock; trim around designs and adhere each to bottom right corner of tote front. Embellish with brown silk flower and green button.
4 Cut strip from brown patterned paper to fit around handle; adhere in place.

Spade and Trowel
1 Cut brown card stock slightly shorter than handles; use wavy edged scissors to trim edges. Cut green patterned paper ½" shorter than brown card stock. Matte patterned paper onto center of card stock, then adhere papers around handles.
2 Cut two 12" lengths from ribbon. Thread each length through handle holes and tie ends in a knot, leaving 1" tails.

Row Markers
Print plant names on blue card stock. Trim card stock to fit row markers and adhere in place. Embellish with flower rub-ons and green buttons.

Pot
Paint inside and outside of pot; let dry. Cut a strip from brown patterned paper and adhere to rim.

Card
1 Cut a 6"x12" piece from coral card stock; score and fold in half for 6" square card. Cut a 5-¾" square from blue card stock; adhere to card front. For "dirt", cut a 1"x5-¾" wavy wide strip from brown patterned paper; set aside.
2 For flower stems cut three ¼"x4" strips. Adhere white flowers onto coral flowers, and blue buttons onto flower centers. Adhere flowers onto top of stems, then adhere flowers and stems onto blue card stock spacing evenly apart. Adhere "dirt" across bottom of stems.
3 Trace and cut out patterns Cut 24 leaves from coral card stock and 12 from green patterned paper. Cut green leaves in half. Adhere green leaf halves to top of 12 coral leaves and to bottom of remaining coral leaves. Adhere leaves with green top to left side of stems and leaves with green bottoms to right side of stems.
4 Print Happy Mother's Day on white card stock. Trim around sentiment and adhere to bottom right of card.

Finishing
Fill pot with excelsior. Arrange pot, trowel, spade, gloves, row markers, and seeds in pleasing manner. Insert card.

Design by Lisa Dorsey.


http://www.craftsnthings.com/Projects/Newsletter/2010_0422/A_momgift.aspx?email=colorspotsportpony@att.net 

 Veronica 

 http://averycountrychristmas.blogspot.com/

http://veronicas-korner.blogspot.com/


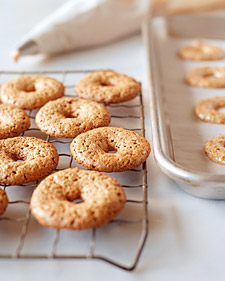
Amaretti Crisps

Amaretti Crisps
Amaretti Crisps
To achieve the most volume, whisk egg whites in a metal bowl set over a pot of simmering water until just warm to the touch.
Prep: 5 minutes
Total: 55 minutes

Ingredients

Makes 20
  • 1 3/4 cups sliced almonds (about 5 1/2 ounces)
  • 1 cup confectioners' sugar
  • 2 large egg whites
  • 1/2 teaspoon pure almond extract

Directions

  1. Preheat oven to 350 degrees. Spread almonds in a single layer on a rimmed baking sheet, and toast in oven until lightly browned and fragrant, 7 to 9 minutes. Remove from oven; let cool.
  2. Combine almonds and sugar in the bowl of a food processor fitted with the metal blade, and grind to a fine powder. Transfer to a medium bowl. In a separate bowl, beat egg whites until stiff peaks form. Fold egg whites into almond mixture; fold in almond extract.
  3. Line a baking sheet with parchment paper. Transfer almond mixture to a pastry bag fitted with a 1/2-inch plain tip. Pipe twenty 2-inch rings onto prepared sheet, about 1 inch apart. Bake until golden brown and firm to the touch, about 25 minutes. Remove from oven, and immediately transfer to a wire rack to cool completely.
From Martha Stewart Living, November 2002
 Veronica 
 http://averycountrychristmas.blogspot.com/
http://veronicas-korner.blogspot.com/

Faux-Leather Box

Faux-Leather Box
Faux-Leather Box
Collectors have long admired the look of antique boxes covered with the skin of snakes, alligators, ostriches, or stingrays, but an inexpensive alternative can be found by covering a box with faux-animal-skin paper.
Tools and MaterialsWooden box
Latex-infused faux-animal-skin paper
Mat knife
Chip brush
Bone folder
Glue, such as Yes paste
Measuring tape or ruler
Scissors
Paint (optional)
Faux-Leather Box How-To1. If desired, paint the interior of the box. Allow to dry.
2. Measure the sides of the box, all the way around, as well as the height. Using a mat knife, cut a long strip of paper to wrap around the sides and the bottom of the box. With a chip brush that's been trimmed down to make the bristles stiff, glue the paper onto the box. Take your time and make sure it's smooth and even; employ the bone folder, if necessary. Trim away any excess paper.
3. Measure the top and lip of the box's lid and cut a piece of animal paper to those measurements, adding a little extra to be safe. Apply glue to the top of the lid, center the lid on the paper, and glue down. Snip a square of the paper at each of the four corners; fold up and glue the sides, trimming away any extra paper.
ResourcesFaux-animal-skin paper and Yes paste can be purchased at Kate's Paperie.

 Veronica 
 http://averycountrychristmas.blogspot.com/
http://veronicas-korner.blogspot.com/